Monthly Archives: September 2012

Proposals Wedding Accessories

If You Like It, Put a Ring On It!

This one’s for the men and for a selected group of  ladies who are non-traditionalists. Those at SimplyBridal, have shared with us a flow chart on how to figure out your other half’s ring size without them finding out before the proposal. Awww you romantic. In my case, the hubster went through great lengths digging around my bedroom and coincidentally, the one ring I owned was sent to , a Hong Kong accessories boutique for a custom hand-made ring. Instead of trying other methods, he courageously took a guess, using his pinky circumference as the sample. And to prove our compatibility, he got the ring size right. First try. So, for you folks looking at finding out the ring size, there’s no right or wrong strategy. Follow this flow chart and see what works for you and if all fails, go with your gut.


Photo credit: SimplyBridal

DIY Projects Wedding Cake

DIY Wedding Cupcakes Tutorial (Part 3)

In this final part of the DIY cupcake tutorial, we thought it’d be nice to show you (photos by the talented Jada Poon Photography) how to make mini wedding cakes using the same cupcake base provided by Sweeth Tooth. Whether you’re thinking of making them for your own wedding or for a friend’s engagement party or bridal shower, they’re so easy you can whip them up in no time. They’ll also look so dainty and professional, you might even start getting enquiries.

Recipes for cake base and buttercream, as well as the ready-to-roll icing can be found here.
Tip: Store-purchased icing is effortless and produces the same results so save the time and energy. I’ve tried making fondant from marshmallow and despite all the sweat I put into it, it turned out to be a complete disaster.

Materials:
Art brush
Ready-to-roll icing
Cupcake base
Buttercream
Ruler
Knife
Rolling pin
Decorating ribbons
Baking paper

Fondant Ribbons
1. Roll out the icing to roughly 1mm thick. You can add food colouring of your choice prior to this step.
2. Cut out a strip of the icing into 15cm x 3cm.
3. Brush a gentle stroke of water along the middle of the strip.

4. Cut out a piece of baking paper and roll into a cylinder (roughly the size of a cigarette).
5. Gently squeeze the two ends of the icing to create a ridge. Do the same for the middle section of the icing.
6. Using the rolled up baking paper, wrap one end of the icing around it and fold it to the middle where the water mark is so that it sticks. Do the same for the other end. You can brush a little more water to stick the two ends together but make sure not to overdo it or the icing will get soggy.
7. Roll out the icing again but this time cut out a smaller strip of roughly 8cm x 3cm.
8. Fold the icing to create almost a lip shape and squeeze the two ends.
9. Wrap the lip shaped icing over the first strip perpendicularly and cut away any extra icing where the two ends meet.

Now that the fondant ribbon is complete, you can sit back and relax.

No, not just yet…..there’s still the cake base to finish off.
1. Slice the top part of the cupcake (the rounder, fatter section) so that it’s flat.
2. Turn the cake base over and spread buttercream to cover the entire cake (except for the bottom). This will be used to hold the icing to the cake.

3. Roll out the icing (big enough to cover the cake and more) and lay it over the cake base.
4. Cut the icing, along the bottom rim.
5. To cover any flaws, wrap some decorative ribbon around the bottom of the base.
6. Brush a tiny bit of water onto the top of the icing and stick the ribbons you just made above it.
7. Looking lovely, your mini wedding cakes are ready to serve.

Photo credits: Jada Poon Photography
Wedding Photography

IMGIN Hong Kong: Photobooth Discount for Bridelicious Readers.

Wedding photo booths are the ‘it’ thing. If you don’t have one then you’re missing out. Oh, I kid you not. So what if Hong Kong is two years behind everyone else in picking up this craze; what’s most important is that it’s fun especially during the waiting time for dinner. It allows guests to let loose and after a few drinks, sometimes too loose. And if your parents’ generation are the relatively serious types, hand over a few props, give them a few tries and they’ll transform into a different person. Don’t worry. No one said you have to forgo those obligatory group photos with guests and fake smiling until your jaws hurt, so your parents will be kept happy. What’s more, your wallet will be smiling too because we’ve got an awesome saving for you.

IMGIN, the creative solutions company founded by young and friendly duo, Jaclyn and Teddy, are offering Bridelicious readers a discounted rate on their photo booth packages. Give them a heads up and they can create custom props as well as decorate the photo booth to fit in with your theme. That doesn’t stop there because they also have other design services up their sleeves. Perhaps you’re looking for an interactive wedding invitation or a customised wedding website. Give them a call or shoot them an email and let them know what your vision is so they turn it into a unique and memorable event.

Photo booth promo details:
Quote promo code: BRIDE2BE
Discount rate: Up to HK$1,000 off depending on number of hours
Rates valid for bookings made before 11 February 2013.  

For further details, click here


Photo credit: IMGIN  

Real Weddings Wedding Photography

Real Engagement Session: Sarah & Will (London) by Marianne Taylor Photography

When you’ve got two lovebirds who were meant to be, coupled with 2012′s Best Wedding Photographer in the UK coming together for an engagement photo session in London, you know the photos will shine. It may have rained on the day Will proposed to Sarah, or on the actual shoot day, but that didn’t put a dampener on their spirits nor does the fact that Sarah lives in the UK and Will in the US. Sarah has always loved Marianne Taylor‘s work and knew that her relaxed style would be perfect for them. That meant when it started to rain (and we all know it rains a lot in London!), the natural reaction was to grab some brollies, go out and let the day go by, just like how it normally would. When the drizzles became torrential rain, they retreated indoors to Sarah’s apartment, filled with snippets of her print design background (worked for both Paul Smith and Cath Kidston!). Oozing with cuteness, and not only from that childhood polaroid, you can tell from the photos how much fun they had even without any props. Sarah & Will and Marianne have shown us that engagement shoots needn’t be fussy. It’s simply feeling at home with each other.


p.s. Sarah & Will’s wedding will be held in Hong Kong next month. To give you an idea of how creative Sarah is, she’s currently making 140 programs all with different floral prints she’s painted in the past. That’s dedication right there!


Photo credits: Marianne Taylor Photography

On how to look relaxed on engagement shoot day, Sarah advised future couples, “to look relaxed is to probably be relaxed. I did my own make up, we wore what we’d normally wear. The shoot was taken at home so that helped a lot. Throughout our session, Marianne kept asking us questions, so we were chatting a lot of the time. For us, it was just another day in our lives. It’s so easy to overthink things but with the whole wedding experience, we’re just hoping to be as true to ourselves as we can. We’re hoping that on the actual wedding day, we can just spend a lovely afternoon and evening with our close family and friends as well!”

DIY Projects Flowers Wedding Decor

The Glass is Always Greener: Recycled Glass Bottles.

I was reading the latest HK Magazine edition on glass recycling in this city and the figures amazed me. You and I contribute to the 374 tonnes of glass thrown away each day and only 3% of it gets recycled. Shame on all of us and shame on the Hong Kong Government for the lack of recycling facilities. So, how can you do your bit to help the environment? Let’s face it, weddings aren’t cheap and every dollar counts. Don’t be afraid or embarrassed to reuse glass bottles and jars as vases or candle holders. All those beers your man drinks, the bottles of wine consumed at the numerous 3-course dinners and jars of pasta sauced used to whip up quick meals can be easily upcycled. Just think of all the options: paint, yarn, lace, ribbon, wrapping paper and twine to transform the glass and if you’re looking to save even more money and time, leave the beer or wine bottles as is to create a shabby chic look. No one will judge.


Photo credits (clockwise from top left): Julie Ann Art, Mallory Joyce, Young House of Love,

DIY Yarn Glass Jar

Materials:
Clean glass bottle or jar
Double-sided tape
Yarn

Process:
1. Stick the double-sided tape to the bottom of the glass jar.
2. Start working the yarn around from bottle of the jar, ensuring the yarn is close together.
3. You can stop circling the jar with the yarn at whichever point you please.
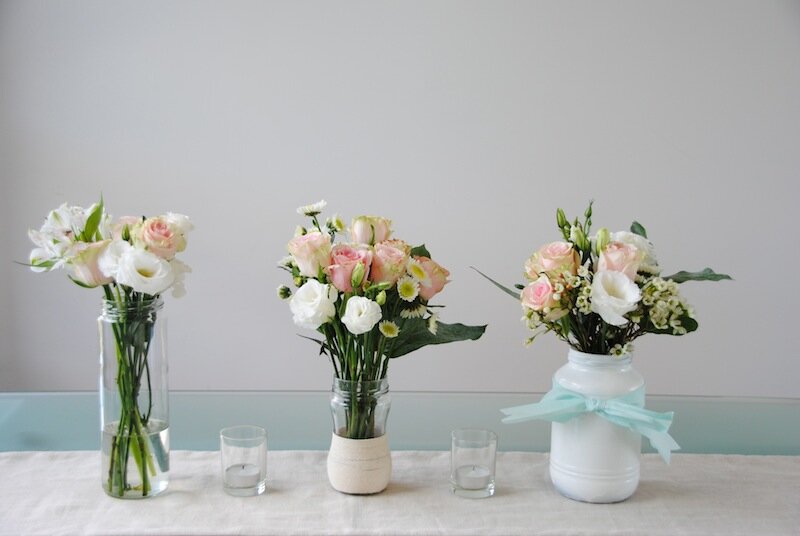
4. Fill your new upcycled jar with flowers (in the photos below, the flowers have been recycled from a wedding that I attended over the weekend. Talk about being green.)

DIY Recycled Glass Bottles
From left to right: Clean glass jar   |   Yarn glass jar   |   Spray-painted glass jar

Groom Wedding Planning

Delegation is the Key.