Category Archives: DIY Projects

DIY Projects Personal touches Wedding Food

DIY Candy Bar.

There’s no doubt that we all love going into a good candy shop (and those who proclaim they don’t are only being health-conscious and holding back on their urges). It brings out the child in us. It gives off a carefree vibe and it certainly satisfies our sweet tooth. Share the memories of your childhood with your guests by setting up a  colourful candy bar filled with your favourites and show that love is indeed very sweet. Set up the bar yourself with this easy tutorial by Yumsugar and prepare bags for guests to pick n’ mix as wedding favours. It’s that easy.


Special thanks to Jessam for inspiring today’s post!


DIY Projects Wedding Stationery

Free Printable: Eat Drink Dance Wedding Sign.

Weddings are about celebrating so make sure you have plenty of food, drinks and music to get the party going. Nothing is worse than a big day that’s forgettable. You want friends and family to have a ball, to leave merry (some so merry they stumble) and proclaim it one of the best, if not the best wedding they’ve been to. Show the guests they’re in for a good time with these free printable signs you can frame or print as a giant poster. Don’t let them forget.


Yellow on Grey click here.

Yellow on Navy click here.

White on black click here.

Aqua on white click here.

Pink on white click here.

Purple on white click here.

Black on white click here.

DIY Projects Wedding Cake

DIY Wedding Cupcakes Tutorial (Part 3)

In this final part of the DIY cupcake tutorial, we thought it’d be nice to show you (photos by the talented Jada Poon Photography) how to make mini wedding cakes using the same cupcake base provided by Sweeth Tooth. Whether you’re thinking of making them for your own wedding or for a friend’s engagement party or bridal shower, they’re so easy you can whip them up in no time. They’ll also look so dainty and professional, you might even start getting enquiries.

Recipes for cake base and buttercream, as well as the ready-to-roll icing can be found here.
Tip: Store-purchased icing is effortless and produces the same results so save the time and energy. I’ve tried making fondant from marshmallow and despite all the sweat I put into it, it turned out to be a complete disaster.

Materials:
Art brush
Ready-to-roll icing
Cupcake base
Buttercream
Ruler
Knife
Rolling pin
Decorating ribbons
Baking paper

Fondant Ribbons
1. Roll out the icing to roughly 1mm thick. You can add food colouring of your choice prior to this step.
2. Cut out a strip of the icing into 15cm x 3cm.
3. Brush a gentle stroke of water along the middle of the strip.

4. Cut out a piece of baking paper and roll into a cylinder (roughly the size of a cigarette).
5. Gently squeeze the two ends of the icing to create a ridge. Do the same for the middle section of the icing.
6. Using the rolled up baking paper, wrap one end of the icing around it and fold it to the middle where the water mark is so that it sticks. Do the same for the other end. You can brush a little more water to stick the two ends together but make sure not to overdo it or the icing will get soggy.
7. Roll out the icing again but this time cut out a smaller strip of roughly 8cm x 3cm.
8. Fold the icing to create almost a lip shape and squeeze the two ends.
9. Wrap the lip shaped icing over the first strip perpendicularly and cut away any extra icing where the two ends meet.

Now that the fondant ribbon is complete, you can sit back and relax.

No, not just yet…..there’s still the cake base to finish off.
1. Slice the top part of the cupcake (the rounder, fatter section) so that it’s flat.
2. Turn the cake base over and spread buttercream to cover the entire cake (except for the bottom). This will be used to hold the icing to the cake.

3. Roll out the icing (big enough to cover the cake and more) and lay it over the cake base.
4. Cut the icing, along the bottom rim.
5. To cover any flaws, wrap some decorative ribbon around the bottom of the base.
6. Brush a tiny bit of water onto the top of the icing and stick the ribbons you just made above it.
7. Looking lovely, your mini wedding cakes are ready to serve.

Photo credits: Jada Poon Photography

DIY Projects Flowers Wedding Decor

The Glass is Always Greener: Recycled Glass Bottles.

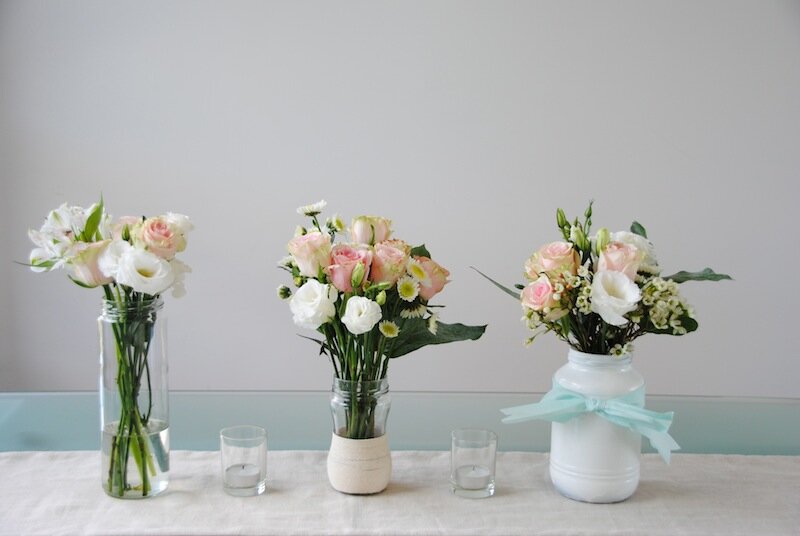
I was reading the latest HK Magazine edition on glass recycling in this city and the figures amazed me. You and I contribute to the 374 tonnes of glass thrown away each day and only 3% of it gets recycled. Shame on all of us and shame on the Hong Kong Government for the lack of recycling facilities. So, how can you do your bit to help the environment? Let’s face it, weddings aren’t cheap and every dollar counts. Don’t be afraid or embarrassed to reuse glass bottles and jars as vases or candle holders. All those beers your man drinks, the bottles of wine consumed at the numerous 3-course dinners and jars of pasta sauced used to whip up quick meals can be easily upcycled. Just think of all the options: paint, yarn, lace, ribbon, wrapping paper and twine to transform the glass and if you’re looking to save even more money and time, leave the beer or wine bottles as is to create a shabby chic look. No one will judge.


Photo credits (clockwise from top left): Julie Ann Art, Mallory Joyce, Young House of Love,

DIY Yarn Glass Jar

Materials:
Clean glass bottle or jar
Double-sided tape
Yarn

Process:
1. Stick the double-sided tape to the bottom of the glass jar.
2. Start working the yarn around from bottle of the jar, ensuring the yarn is close together.
3. You can stop circling the jar with the yarn at whichever point you please.
4. Fill your new upcycled jar with flowers (in the photos below, the flowers have been recycled from a wedding that I attended over the weekend. Talk about being green.)

DIY Recycled Glass Bottles
From left to right: Clean glass jar   |   Yarn glass jar   |   Spray-painted glass jar

DIY Projects

DIY: Chalkboard.

Today’s DIY project is so simple you’re not even going to break out in a sweat. Although, given the recent heat, even just walking out onto the balcony is taxing. I’ve previously mentioned the paint brand Rust-Oleum, a luxury item in the chalkboard world, so when I came across the Martha Stewart Crafts collection at Michaels in Vancouver, I was like a kid in a candy store. Literally. I know I’m not being helpful by recommending a product that isn’t available in Hong Kong (nor do the US retailers ship internationally at this point in time) but I discovered a chalkboard paint in the middle of busy Mong Kok for an absolute bargain. Now, don’t say I don’t share.


DIY Chalkboard Materials:
Black Chalkboard paint @ HK$24 for 59ml – Art Supplies Professional |   77 Bute Street (at Sai Yee Street)  | Mong Kok
Foam paint brush – any art shop
Surface to paint on (frame is from Michaels for CAD$2 or alternatively the wooden board is from CN Square for HK$25)


Tutorial:
1. Make sure your surface is clean and apply the chalkboard paint generously.
2. Using the foam paintbrush, brush the paint in one direction to cover the surface.
3. Allow the paint to dry for one hour then apply the second coat in the opposite direction.
4. Once it’s dry, write out your sweet nothings!


DIY Projects Personal touches

Free Printables: DIY Sock Covers.

It’s been a long week hasn’t it? To celebrate the start of the weekend and because I’m so darn nice, I’ve got some free printables for you. Just to help add that extra touch of personal charm to your big day. I designed these sock covers for Cath & Kev’s wedding two weeks ago (oh how time flies) and they’re more than happy for me to share the design with you fab lot. It’s such an easy DIY project that you can whip up in no time. All you need is a printer, some paper (preferably around 140g thick), scissors and you can be a crafty goddess. I’ve got two colour combinations for now and will be adding more, so keep a look out! And if you ask nicely, I may even design one in your wedding colours. Enjoy!


Navy + Pink Polkadots 
Groom
Best Man + Groomsmen

Aqua + White Polkadots
Groom
Best Man + Groomsmen


Photo credits: KC @ www.chankichun.com


DIY Projects Wedding Cake Wedding Food

DIY Wedding Cupcakes Tutorial (Part 2)

Happy Friday! Typhoon Kai Tak has come and gone but the skies are still grey. Spend this weekend baking and decorating away and get some practice before making these delectable cupcakes for your own wedding. Haven’t you heard the saying ‘practice makes perfect’? Thanks again to Sweet Tooth and Jada Poon Photography for such a lovely and sweet afternoon!


Cupcake Recipe can be found here.

Cupcake Decorating Materials:
Art brush
Cutters – flower and leaf
Tweezers
Piping tubes and bags
Modelling Tools – Flower and Leaf Shaping Tool
Modelling Tools – Ball Tool
Water
Foam for resting the decoration
Sprinkles – Pearl Coloured Balls
Ready to Roll Icing
Buttercream
Food Colouring

Tip: Turn up your air-conditioner as you’ll want to make these in a cool environment or else the buttercream and icing will melt. You don’t want your efforts to be wasted.


Buttercream:
1. Add food colouring of your choice to the buttercream that you made using Sweet Tooth’s recipe.
2. Fill a piping bag with the buttercream.
3. In a circular motion, squeeze the buttercream onto the cupcakes.

Leaves:
1. Add green food colouring (a dash or two) to read to roll icing.
2. Roll out the icing to roughly 1mm thick.
3. Use the leaf cutter to cut leaf shapes.
4. Using the leaf modelling tool, score the leaf in the middle to give them the veins.


Roses:
1. Add food colouring of your choice to ready to roll icing.
2. Roll out the icing to roughly 1mm thick.
3. Cut icing into a small strip of roughly 40mm x 8mm.
4. Use your fingers to gently wrap the icing around into a rose bud and pinch the bottom of the roll (see above image).
5. Brush a dab of water on the end of the leaf and attach the rose bud so that they’ll stick together. Leave to dry.


Flowers:
1. Add food colouring of your choice to ready to roll icing.
2. Roll out the icing to roughly 1mm thick.
3. Use the flower cutter to cute flower shapes. You can use more than one coloured icing.
4. Using the ball modelling tool, nudge the middle of the flower in a circular motion so that the petals will curl up (see above image).
5. Place two flowers on top of each other and use the tweezer to add the pearl balls to the centre to finish off.
6. You can leave the flower as is or add a leaf to it.

You can add the flowers and roses that you made to the buttercream frosting as you desire. Alternatively, you can simply decorate with a flag to thank the guests or place them in patterned cupcake liners. Have fun!

Photo credits: Jada Poon Photography

DIY Projects Wedding Cake Wedding Food

DIY Wedding Cupcakes Tutorial (Part 1)

In this three part post, I’m sure you’ll be drooling from one photo to another. One sunny afternoon, I, together with Carrie from and Jada from Jada Photography spent a few hours learning the tricks of the trade to transform any cupcake into an edible delight. Perfect for a bridal shower, as a wedding cake alternative or as a wedding favour, you’re going to give yourself a pat on the back after your own cupcakes session. Here’s the start to your cupcake feast.


Vanilla Cupcake Recipe by

Cupcake Ingredients:
1 stick unsalted butter, room temperature
1/2 cup granulated white sugar
2 large eggs
1 teaspoon pure vanilla extract
1 1/2 cups all purpose flour
3/4  teaspoons baking powder
1/2 teapsoon baking soda
1/4 teaspoon salt
1/2 cup (60 ml) milk


Confectioners (Buttercream)Frosting Ingredients:
2 cups (230 grams) confectioners sugar (icing or powdered sugar), sifted
1 stick unsalted butter room temperature
2 tablespoons milk or light cream
Assorted food colors(if desired)


How to make the Cupcakes:
Preheat oven to 350 degrees F (177 degrees C) and line 12 muffin cups with paper liners.
In the bowl of your electric mixer, or with a hand mixer, beat the butter and sugar until light and fluffy. Add the eggs, one at a time, beating well after each addition. Beat in the vanilla extract.
In a separate bowl whisk together the flour, baking powder, baking soda, and salt.
With the mixer on low speed, alternately add the flour mixture and milk, in three additions, beginning and ending with the flour. Scrape down the sides of the bowl as needed.
Evenly fill the muffin cups with the batter and bake for about 17 -20 minutes or just until set and a toothpick inserted into a cupcake comes out clean. (Always check a few minutes before the stated baking time. Do not over bake or the cupcakes will be dry.)
Remove from oven and place on a wire rack to cool.
Once the cupcakes have completely cooled, frost with icing.


How to make the Confectioners (Buttercream) Frosting:
In an electric mixer, or with a hand mixer, cream the butter until smooth and well blended.
With the mixer on low speed, gradually beat in the sugar. Scrape down the sides of the bowl.
Add the milk and beat on high speed until frosting is light and fluffy (about 3-4 minutes). Add a little more milk or sugar, if needed.
Tint the frosting with desired food color (if desired).


Photo credit: Jada Poon Photography
DIY Projects Personal touches

Real Weddings: Joss & KC (DIY Wedding Favours)

If you’re into truly original weddings, you’re going to love this DIY film roll wedding favour that Joss and KC handmade for over 300 guests that’s filled with passion and love whilst being environmentally friendly . As you’ve seen earlier this week, KC of www.chankichun.com was the one behind the lens for Jas & Alan’s Bali wedding, so you can probably understand how important it was for him to incorporate a photography-related gift when it came to his own big day. This project meant that Joss and KC spent two months scouring through all camera shops in Hong Kong and asking for used film rolls (the shop owners must have been scratching their heads!) to complete their 400 rolls collection. What makes this unique wedding favour stand out is its personal aspect. How many times have you attended a wedding and received chocolates or chopsticks, ate, used or simply left them without remembering who they’re from? Give it some thought.


“We thought about little albums but then it’s too costly to print an album for each guest (we had about 300 guests). We then had the idea of using used film roll and paper strips to create an album in the shape of film rolls. I was so excited when we got the idea!” 


Photo credits: KC @ www.chankichun.com

Destination Weddings DIY Projects Wedding Stationery

Real Weddings: Jasmine & Alan (DIY Invitation)

By now, you’ll probably know I’m in love with all things DIY. It demonstrates one’s creativity and most important of all, their personality. When I found out that Jasmine & Alan’s wedding invitation was designed by the couple themselves, I knew I had to feature their creation. Both in the professional sphere, let’s just say their daily work involves numbers and documents and as you can tell, a world away from the arts. Together with two bridesmaids and an iPad in hand, this invitation is truly a reflection of “great teamwork”.


The Design: 

“I first drew/wrote the draft and then we tried to look for a couple of printers to estimate costs. So glad we found a cheap local one (run by a couple of warm-hearted middle-aged women!) as we wanted to keep it under HK$15 per set.” 

“With the printed cards in single colour, I got two talented bridesmaids, Joanne and Viv, to join me to paint all of them.”

“At last, Alan and I finished with our fingerprints and two smiley faces at the back to add a personal touch on a rather commoditised wedding accessory these days.”

 ”You can probably tell how excited I am with the end product!”

Wedding Photography: KC @ www.chankichun.com
Invitation Printers: Kam Shing
iPad Drawing App: